Button's Creations

Sunday, May 8, 2011

My Pink Stamper Challenge 6 - Incorporate a TAG

I have finished yet another one of My Pink Stamper's National Scrapbook Day challenges. They are all not due until tomorrow night. This card I again used scraps I had so I don't have the details for anything other than the Cricut Cuts! this card is for my daughter's Teacher Assistant for the end of the school year!


I used Paper Dolls Dress Up for the Cowgirl
Everything was cut at 3.5 inches
The tag is from the Old West Cartridge which I distressed with Tim Holtz Tea Bag
The stamp is from My Pink Stamper a special edition Robin made for the TX Stampede in March!
Ink was Stampin Up Chocolate Chip
Twine in brown from the Twinery

Saturday, May 7, 2011

My Pink Stamper Challenge 8 - Make a Summer Themed Project

When I saw this challenge I immediately thought of the beach!


Again I am not sure of the paper information as I again used my scraps for this project!!! Yeah for less scraps!
Doodlecharms Cartridge
Palm Tree and all layers cut at 3.25 inches (I popped up the coconuts)
Sun - Shadow and Regular cut 2.25 inches; face Peachy Keen Stamps Funshine Face Assortment
Sandcastle - cut at 1.25 inches then distressed with Tim Holtz Tea Bag and I used red Stickles on the flag
The sentiment was a random one I have in my collection and I used Stampin Up Chocolate Chip Ink

My Pink Stamper Challenge 3 - Make Something with a Breast Cancer Theme

I really wasn't sure what I was going to do for this challenge and then I sat down and started working. The card is pretty simple but I think it is really nice. After I finished the card I remembered that one of my co-worker's mother has just been diagnosed with stage 3 breast cancer. Guess where this card is going......


Life's a Beach Cartridge
Hope - Shadow cut at 3.25 inches - Stampin Up Melon Mambo
Hope - cut at 3.25 inches - Hobby Lobby The Paper Studio Safari Untamed Paper Pack
Card Base - Michael's Recollections - Precious Metals - Black cut 5.5 inches wide and 8.5 inches high folded in half
Hand stitching white Signo Jelly Roll pen
My Pink Stamper Stamp
Ranger White stamp pad
Because the base of the card is black I put a white writing area on the inside cut at 5 inches x 4 inches and stamped the ribbon in the bottom right corner with Stampin Up ink - Pink Passion

My Pink Stamper Challenge 2 - Use Kraft Cardstock

Ok so for this challenge I decided to make a card that I know I am going to need for a friend of mine who is having a baby soon.


8.5 x 11 Kraft cardstock cut for an A2 card
Life's a Party Cartridge
Carriage and all layers cut at 4 inches
Hand stitching around the hood of the carriage with a white Sakura Gelly Roll pen
Random Baby sticker from my stash
Again I used scraps for this card so I don't have the specific details on the paper!

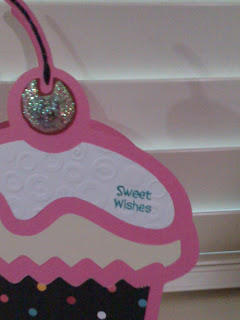
My Pink Stamper Challenge 1 - Anything Cupcake!

The first challenge was anything cupcake! I decided to use the cupcake on Hello Kitty Greetings cartridge. I used all scraps for this card so I don't know exactly what the specific brands and colors of the papers are. But can I get whoop whoop for using scraps!!!


I used the cupcake card feature and cut it at 7.75 inches with all layers cut at 7.75 inches
I blinged up the cherry on top with Crystal Stickles and used Black Stickles for the cherry stem
For the top layer of icing I used the Circles Cuttlebug folder to emboss and give some texture
The stamp is none other than My Pink Stamper - Simply Sweet Occasions
Stampin Up ink pad - Bermuda Bay
My Pink Stamper is having a National Scrapbooking Challenge today consisting of one challenge every hour for 12 hours! How fun!!! This is going to be my very first entry in a challenge! Yeah.......one of my New Year Resolutions complete!!!

Sunday, May 1, 2011

Teacher Present

So I finally figured out what I was going to make for my Daughter's teacher this year. I made a box containing little note cards with her initial on them. It really did take me all day because I got the colors together and then didn't really know what exactly I was going to do with them. I had a general idea of what I wanted but didn't know how to execute! But here is the finished project and I am sooo very pleased with it. Of course I did forget to take a picture of the note cards prior to packaging them all up!!! Silly me!!!!!

So here is the finished product!!

I put the box of note cards in a cello bag and then topped it off with a 4 inch piece of coordinating paper folded in half. I covered the staples with a 1.25 inch piece of coordinating paper an the scallop circle is from Accent Essentials cut at 3 inches. Most of the paper was from Stampin Up (Can I just say I love their paper!!) and the "B" was cut at 2.75 inches from Plantin Schoolbook then I used the Swiss Dots Cuttlebug folder to give some texture. I really did love this finished project and wish I would have taken a picture of the note cards. Not too bad for a Sunday project!!

20 Noted Cards @ 3.75 inches x 4 1/8 inches
- Boarder strip 1.75 inches x 3.75 inches (wrapped with ribbon)
- Scallop circle (Accent Essentials) 3 inches
- Letter (Plantin Schoolbook) 2.75 inches (embossed with Cuttlebug Swiss Dots)

Homemade box
- Top 6 inches wide x 6.5 inches high (scored at 1 inch all the way around)
- Bottom 7 3/8 inches wide x 7 7/8 inches high (scored at 1.75 inches all the way around)